An Easy Sew SCA gambeson.
(It looks intimidating but its really simple)
Matching Cuisses and upper/lower arms (different than what's in the pic, these are detachable/removable) padding currently in progresses if you need any help email leonharthunt@gmail.com (I will do my best to answer any questions, but I am a novice sewer only been sewing for a short time)
One of the predicaments I found when I joined the SCA was the desire to make as much of my gear as I could myself, My first real challenge was an easy sew gambeson, especially with my limited/non- existent sewing skills.
Luckily I had my Lady to help me, Unfortunately she also had limited sewing skills, It took us 2 years to produce the design. The prototype has been SCA heavy combat tested for 6 months. (additional 1 year later and the gambeson is still proving its worth, I have not even had to repair it)
The design is credited to my Lady and Elias &; Gheleyn for the creation of the 2nd Prototype and sewing notes.
 |
| Prototype Gambeson Front |
 |
| Prototype Gambeson Rear |
The Gambeson is made from Cotton duck stuffed with wool, as you can see from the above images the arms are designed to allow free movement while still maintaining full protection. Also note that I have designed an integrated kidney protection (Aluminium split covered in Cotton duck)
The final gambeson weighs about 3kg (including Kidney protection) and meets minimum padding requirements (so your elbow cops/ Gorget requires no additional padding)
Materials:
- 4 Meters of cheap cloth for a mockup (Tip, calico)
- 6 meters of cotton duck (this may vary depending on size requirements)
- 2 Spools of heavy weight thread (also known as upholstery thread)
- About 3kg's of Wool (clean) carding not required, (Tip, Talk to spinner and get wool unsuitable for spinning) the easiest time to get wool is during shearing season but is usually available all year round from spinning supply stores
- 6 - 9 Buttons (Tip, I suggest metal or heavy grade buttons they can get clipped by rattan)
- A small amount of cord for arm lacing (you can use buttons but I have found the lacing to be superior so I can slip forearm guards into the sleeve
- A tunic/doublet pattern I use a commercial one simplicity 4059 (available from most fabric retailers or you can order it here: http://www.simplicity.com/) I suggest a 4 piece pattern (not including skirt)
- 1 meter of 50mm wide 3mm thick aluminium (available from miter 10 or bunnings) for the kidney protection
Tools:
- Basic Sewing Machine (do not need heavyweight capability or special needles) Ideally with buttonhole capability but you can hand sew buttonholes.
- A few needles for hand sewing
- Sharp Scissors or Shears
- Tailors chalk in a colour you can see clearly on your fabric
- An arrow shaft or a piece of 8mm dowel
- A friend to help with seams, fitting and measuring the mockup
Optional Tools/Materials: (not required but helpful)
- Overlocker to finish edges
- Bias binding to finish lower edges
Step 1: Mockup of the Torso
Layout (doublet/tunic/simplicity) pattern and decide on size requirements (do not enlarge pattern at this point) this stage is to make a mock up gambeson that will fit you unstuffed
Take your cheap fabric and cut it out following your doublet/tunic pattern then pin the seams and try it on (Tip A friend helps alot at this point) make sure the front meets with a 3 cm overlap (for the buttons) adjust the mockup until it fits well (do not worry about collar/sleeves or skirt at this point)
Step 2: Mockup of the Skirt
With your torso mockup on measure the distance from the front join of the torso mock up to about 3 inches above your knees and then do the same at the back to the same point on the knees from the rear. Measure the waist and then taking these measurements form a mockup of a skirt to go from the torso mock up to 3 inches above your knees.
Congratulations your mockups are complete time to start on the real thing.
Step 3: Resizing the torso
 |
| Front of torso resizing from mockup (Image courtesy of Elias & Gheleyn) |
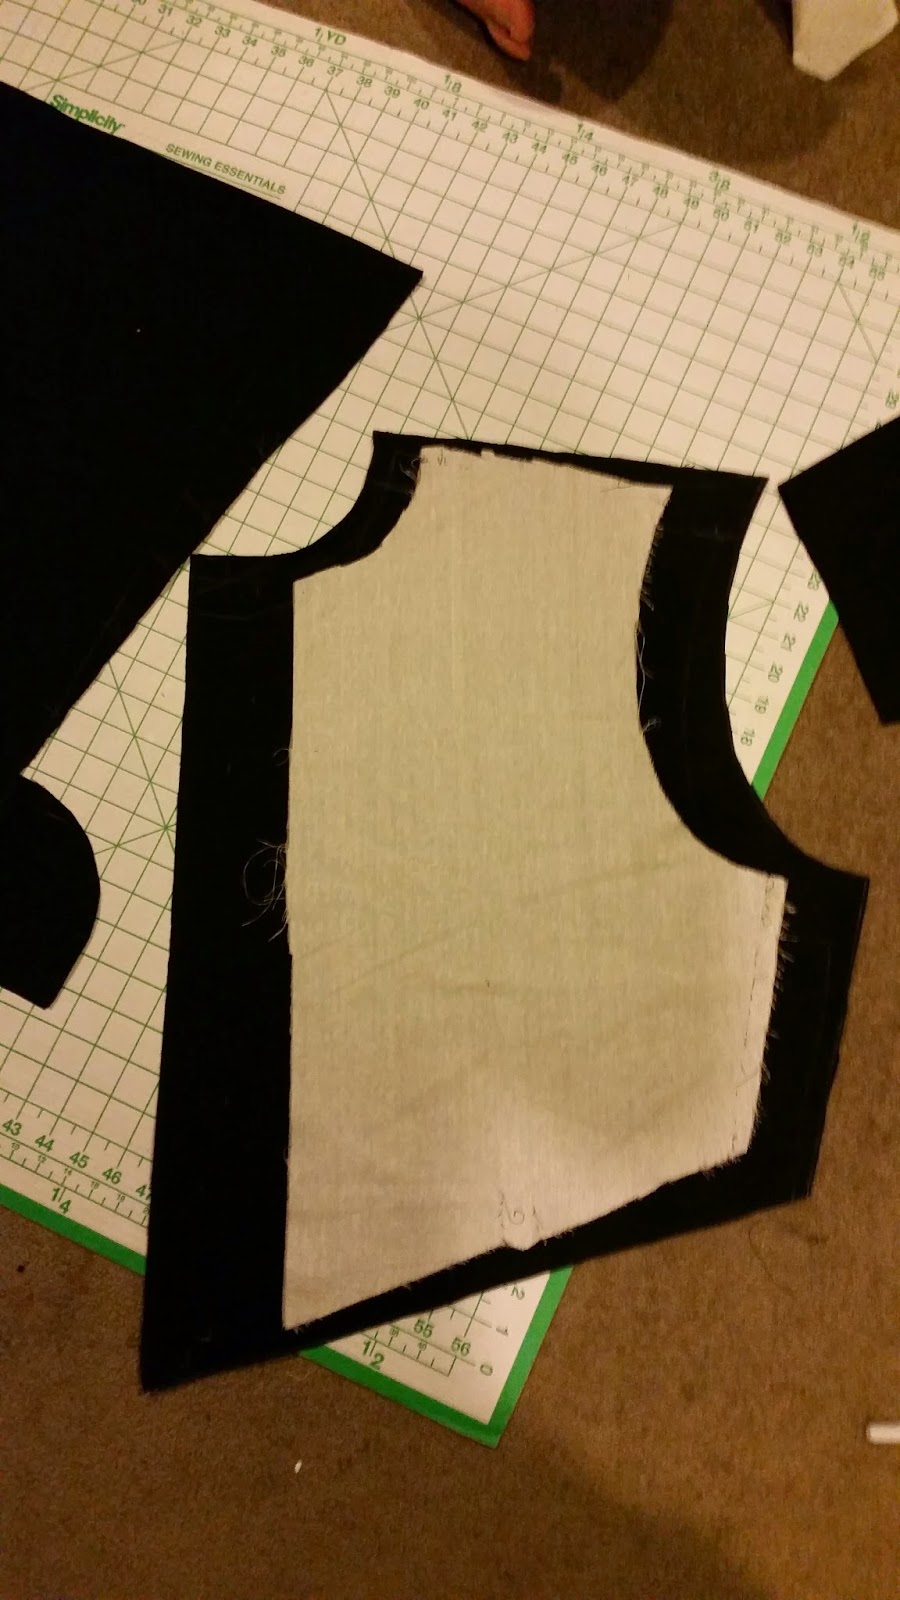
Unpin your torso mock up and lay it out flat on top of your cotton duck (doubled so you cut 2 at once, if you are making it all the same colour you can cut 4 at once if you wish and have sharp scissors) you need to add 1 CM for every 3 CM's of fabric in a horizontal direction to the torso this includes the neck.
Do this for all four of the torso pieces, it is critical you ensure the measurements are accurate. (There is a little give in the design as the channels will hug you)
Cut your newly resized front torso out (x2 or x4)
 |
| Back of torso resizing from mockup (Image courtesy of Elias & Gheleyn) |
Step 4: Resizing the Skirt
Following Step 3's instructions repeat for the skirt of the gambeson Cut 4 total
Step 5: The channels and seams
Now you have 8 Torso pieces (4 Front and 4 back) its time to sew the channels and the edges, Do not sew all edges as you need access between the layers to stuff the wool. (seams as designated by your pattern usually 1.5cm)
 |
| Front of torso seams note: the pinning (Image courtesy of Elias & Gheleyn) |
The front, (if the piece is facing you like in the above images) only sew the Left side, Top and the Arms curve. leaving the bottom and bottom right/left for access to the channels for stuffing.
The back, (if the piece is facing you link in the above images) Sew only only sew the Left side, Top and the Arms curve. leaving the bottom and bottom right/left for access to the channels for stuffing.
Now all the pieces are seamed you can start sewing the channels for the wool this is done by first measuring 3CM out from the arm curve's seam (following the curve of the seam) so you create a 3cm "pocket" following the curve of the armhole you want to make 4 of these. (see image lower right)
Once the arm channels are laid out measure 3cm channels on the rest of the torso between the seams like image below.
Then repeat for the Skirt as above.
 |
| Back of torso + skirt channel layout in tailors chalk before sewing. (Image courtesy of Elias & Gheleyn) |
 |
| Front of torso + Sewn with button holes added (Image courtesy of Elias & Gheleyn) |
 |
| Stuffed Skirt Piece (Image courtesy of Elias & Gheleyn) |
 |
| Stuffed back torso (reversed) (Image courtesy of Elias & Gheleyn) |
Step 6: Get Stuffed!
Now you have all 4 pieces of the torso channelled and the 2 pieces of the skirt the same, its time to start stuffing, Starting with the torso's arm curves take small amounts of wool (about the size of your thumb) line it up with the opening in the bottom of the channels and push it down the channel using the dowel, (do not push too hard, while duck is strong you can rip it) IMPORTAINT! do not overstuff the armholes, fill moderately enough to provide padding but not so much to inhibit movement. (It should feel firm but not rigid.)
 |
| A keen helper eating a lemon (Image courtesy of Elias & Gheleyn) |
 |
| Front torso stuffed (note buttonholes on the left) (Image courtesy of Elias & Gheleyn) |
Now onto the skirt, stuff away!
Step 7: Putting it all together
Starting with the back, Take the 2 back torso pieces hand sew (using strong thread) them together with the excess of the seams facing inwards.Then move onto the front of the torso stitching the top then the side below the arms.
Finally stitch the Skirt to the torso and then the Buttons! Congratulations the first part is over, rest your tired hands.
Step 8: Arms
the arms are tricky, you want full movement but don't want the padding to bunch or create heat traps, The pattern you used for the Doublet to get the base design is a good start, you want to take the top parts (if your pattern is in 2 pieces with an upper and lower) and create an arm but only to elbow.
I found that to keep full movement and still provide good protection a special elbow needs to be created (see below image)

The elbow is made of of four pieces like the one of the left until it forms a bowl around the elbow (means no matter what position the elbow is in, it stays fully padded by the wool)
 |
| Gambeson Arm (yes some of my wool is escaping because I used a loose weave fabric for the outer a tight weave like Cotton Duck doesn't have this issue as far as I know) |
As you can see by the above image with the elbow attached and the upper and lower of the doublet pattern useds as a template following the method as resizing for the body it solves the arm, movement issue and also stops the gambeson riding up on the wrist each time the arm is moved.
I hope you find this guide helpful in creating your own gambeson.
In service,
Lord Leonhart Hunt
Incipient canton of Wildmoor
Southron Gaard
Lochac
Hello! I was wondering if you have any advice for how to integrate the kidney belt portion of this particular arming jacket. Thanks in advance!
ReplyDeleteValgautr (Charles)
Hi Valgautr, What I do is sew pockets for 2mm aluminium plates strips along the kidney portions, if you look at the first image set "Prototype Gambeson Rear" you can see this done on the prototype it provides ample coverage for your kidneys, esping as you have underlying it the wool padded channels.
ReplyDeleteI use 90mm wide stips of 2mm aluminium (but you could use heavy leather or steel) which you can buy in lengths from hardware stores